“ Elins Nails: OPI
Showing posts with label OPI. Show all posts

07 July, 2014

Dot Nail Art

I hope you all had a good weekend, I sure did! And now I'm back with a new set of nails for you. It's a pretty easy nail art, but it still looks so good.

Dot Nail Art by Elins Nails

This is made using dotting tools in all different sizes and some great colors. I decided to do a accent nail just to spice it up a little. 

Dot Nails by Elins Nails

I'm using my favorite nailpolish right now in this Nail Art. The golden one. It's from Gwen Stefain's OPI collect and its called Love Angel Music Baby. It's a lovely matte color, which they are calling satin. And you are not suppose to add topcoat on it, but I just think it's so amazing both without and with topcoat. I took a picture of this Nail Art before adding the topcoat so you can see for yourself. That picture you can find her below. 

Dot Nail Art without Topcoat by Elins Nails

Nailpolish -
Isadora - Second Nail
OPI - Love Angel Music Baby
Ciaté - Pepperminty
Essie - Watermelon
Seche Vite - Topcoat 

25 October, 2013

Texas Nail Art

I have since a few months back worked on becoming an Au Pair in the US, and last week I finally found my host family. So in less then a month I will be going to Texas to work as an Au Pair there for the next year. My updating might be really bad during that time but I will try to update some. So to celebrate this I did Texas nails, with the Texas flag. And I know the flag is wrong for this angle but from my angle the flag is right. So you just have to imagine it or turn your computer upside down or something.


To do this nails I started with base coat and then two layers of white. Then with the red nail polish I painted half the nail, using the nail polish bottle brush. Then with a pretty thin brush I painted the blue on freehand. 


Then I thought about painting white stars on the blue but then I decided to just use some star charms on instead. Taking the easy way out. 


The Nail polishes I used are these -
Don't forget to use base coat to protect your nails.


White - OPI - Alpine Coat
Blue - China Glaze - First Mate
Red - Gina Tricot - Formula One
Top Coat - Nails Inc - Caviar Top Coat


21 August, 2013

Perfect Clean Up after painting your nails.

Everyone knows its not the most easiest thing to paint your nails perfectly, but what makes them look perfect is the perfect clean up, not only from nail polish outside your nails but also to get perfect line around your cuticles. To do this there are a few different techniques which I thought I would show you today.


The first thing is that you can use cotton swabs (q-tips) dipped in nail polish remover. But this is probably just best if you got nail polish outside your nails. It's not the easiest thing to get the perfect clean up around your cuticle with a cotton swab though.

The next thing is a nail polish correction pen. I used one for the swedish store Kicks, from their own brand.

Kicks Nail Polish Corrector by Elins Nails

Its like a pen full with nail polish remover. Its a good and easy way to get a good clean up. But the downsides which I found about this is that the tips easy broke and got ugly. But luckily you usually get a few extra tips with. These pens are available from OPI and Essie too that I know of at least. 

But after trying all different ways this next thing is my favorite. I use an angled eyeshadow brush that I bought pretty cheap. 


Just dip it in nail polish remover and its great for the clean up around your cuticle. To get the best looking nails it looks best if you clean so the nail polish don't really go all the way down to the cuticles. 

I hope this helps you all to get the perfect clean up!

29 July, 2013

Nails inspired by art by Keith Haring.

Trying to come up with new design I looked through my memory to find some thing to get inspired from. Then I remembered this artist that we talked about in art class years ago. I remember he had some cool theme through his works. My problem were just that I didn't remember his name. So I spent some time searching through the world of internet and then I found it. The artist was Keith Haring. So here comes the results of my nails inspired by Keith Haring.

Keith Haring Nail Art by Elins Nails

This is the work that inspired my nails.


Close up - Keith Haring Nail Art by Elins Nails


To do this nails I started of with a coat base coat and then two coats of white. Then I used a thin brush to paint all the characters and then with a striping brush I did all the black lines around them. The heart I did with a dotting tool though. Topped it off with a top coat and its done!

Keith Haring Dog Nail Art by Elins Nails

Giving you a picture of my thumb too, just because I'm feeling generous. But it looks a little weird though haha. 


The nail polishes I used - 


Base coat - Isadora - Second Nail
White - OPI - Alpine Snow
Orange - Isadora - South Beach
Red - Gina Tricot - Formula One


Yellow - Face Stockholm - 171
Blue - China Glaze - First Mate
Green - Sephora - Picnic In The Park
Black - Isadora - Gothic Black 
Top coat - Seche Vite


Thanks for looking in here and I hope you liked what you saw. 


27 July, 2013

Tribal Nails

Sorry for not updating in a while. Been working, been on vacation and just been general lazy. I haven't even painted my nails in so long which isn't alike me at all.

But now I'm back and I'm back with a tribal printed nail art. Some girl even asked me if they were stickers when I was out shopping. I guess that's something good, haha.

Tribal Nail Art by Elins Nails

I know the lines aren't the straightest lines and the cleanest clean up, but it's what I got for you today. For this design I used a striping brush and a dotting tool.

The nail polishes I used for this design -

 Don't forget base coat to protect your nails.

White - OPI - Alpine Snow
Pink - Essie - Watermelon
Blue/Green - Essie - Turquoise & Caicos


Black - Isadora - Gothic Black
Purple - H&M - Lilac Plum
Top coat - Seche Vite

Sorry for being away so much, but I will try to make it better for you!

13 July, 2013

Black and white Nail Art

Today I wanna share an easy design. Not the most colorful one but I like it. Looks kinda cool according to me.

Black and White Nail Art by Elins Nails

To do this design I started with a base coat as usually. Then I painted two layers of black. Once it was completely dry I freehand painted with a thin brush and then added some dots with a dotting tool just to make it a little prettier. 

Black And White Nails By Elins Nails

Then I just added a layer of top coat for the finishing touch. 

The nail polishes I used -


Don't forget to base coat to protect your nails. 
Black - Isadora - Gothic Black
Vit - OPI - Alpine Snow
Top coat - Seche Vite

Thank you for checking in, and I would love if you left a comment for me. Requesting a design or just letting me now what you think of this one!


04 May, 2013

Band Nails - One Direction Nail Art

Tomorrow I will be on my way to Denmark to go on a concert and I just had to paint my nails for this special occasion. I'm going to see One Direction, my favorite band. I seen them before and then I had nails inspired by them too.

One Direction Nails by Elins Nails

Since all the nails are different I will explain how I did them one by one. First I put on base coat on all my nails. 

On my index finger I have the Irish flag, because Niall in the group is from Ireland. I started with two layers of white. Then I actually used the nail polishes brushes to paint the green and orange on it. 
For the middle finger I started with two layers of red and then with a striping brush I wrote TMH which stands for Take Me Home which is the name of their newest album and the tour. 
On the ring finger I painted the british flag because the four other members are from UK. For this I started with two layers blue and with a a striping brush I painted the white and then the red on it.
And then my pinky I wrote the first letter of every member. I started with two layers of white and then with the colors I used for the rest of the nails I wrote it with a striping brush. And then with a small dotting tool I made a heart. 


One Direction Logo Nail by Elins Nails

And on my thumb I did One Directions logo with a striping brush. Started with two layers of red first. 

The nail polishes I used- 


Don't forget base coat.
White - OPI - Alpine Snow
Red - Claudia - All Red
Blue - H&M - Turquoise 


Orange - Ciaté - Speed Dial
Green - Ciaté - Mojito
Top Coat - Ciaté - Seche Vite


01 May, 2013

American Flag nails - French Manicure Twist

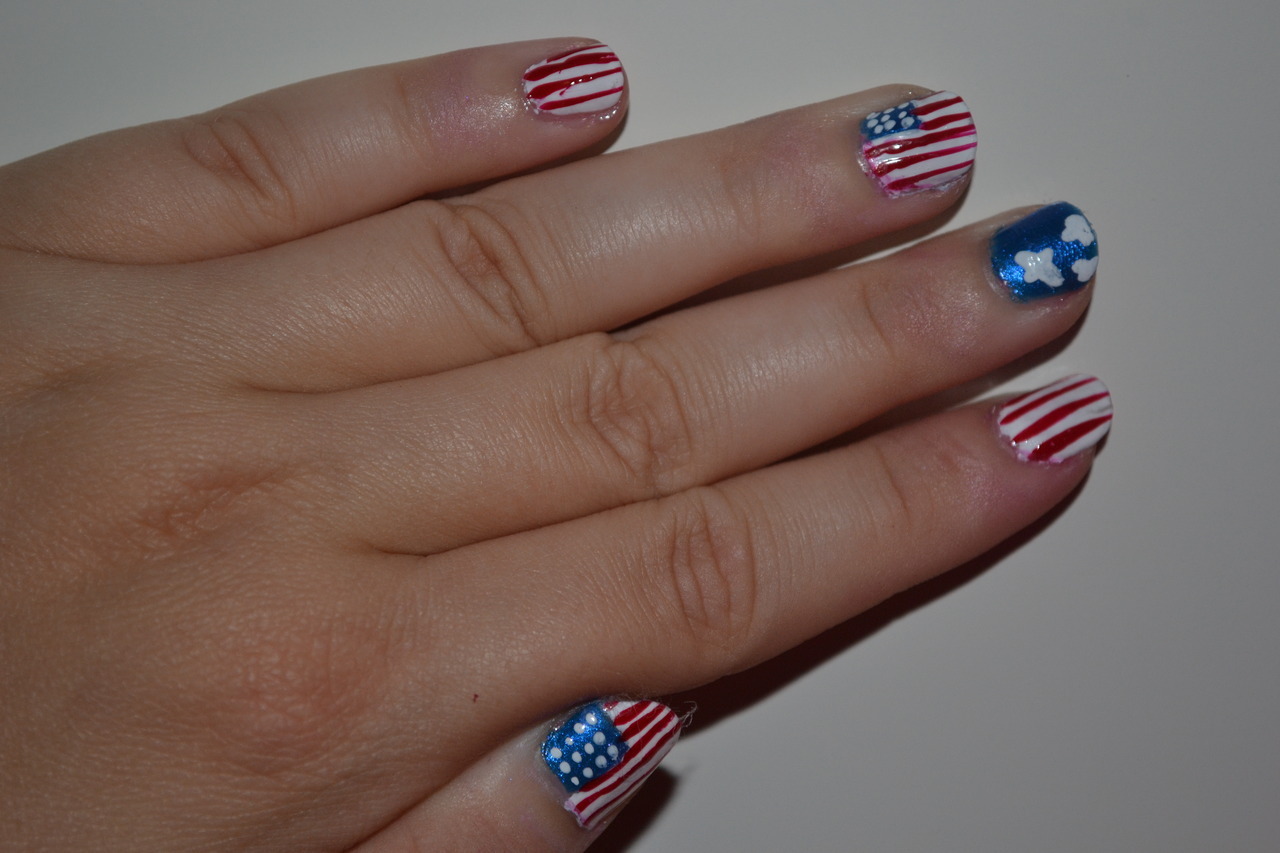
Todays nails are inspired by flags and none other then my favorite country's flag, USA's flag of course.

I done familiar nails before for fourth of july last year but when looking back at them now I'm not so proud of them haha.


Oh gosh no, we shouldn't look at them. Lets go on to todays nails instead. But I guess this means that my nail art skills have grown better and thats always something good. 


American Flag Nail Art by Elins Nails

With this nails a did a little twist of the classical french manicure. I started with base coat as usually, and then I did two layers of white nail polish. Then with a striping brush I made the red lines all over the nails. Once those were completely dry I took some french manicure templates. The package I have had 2 different kinds, curved and straight, and I took the straight ones. Which I think are for you toe nails actually but who cares? I painted the tips blue and later when it was dry I did small dots with a dotting tool over the blue to symbolize the stars on the flag.  


Matte American Flag Nails by Elins Nails

After a while I decided that I might look cool matte. So I made them matte. It's not often I have matte nails but it looks cool so I should probably do it a little more often.


The nail polishes I used for this is -


Don't forget base coat all times to protect your nails.
White - OPI - Alpine Snow
Red - Gina Tricot - Formula One
Blue - Sephora - Curaçao
Matte topcoat - Essie - Matte About You

Which way did you like more - shiny or matte?


29 April, 2013

Star Nail Art - Twinkle Twinkle Little Star

The nails I wanna show you today came into my nails when I was home sick with a bad cold and fever. I was feeling down and just needed some color to cheer me up. So colorful nails was what I wanted. The design wasn't the easiest design and it didn't make it better that all my nails are so short. They all broke when I wasn't wearing nail polish for a week, shame on me.

Star Nails by Elins Nails

Painting stars aren't my biggest talent let me tell you that, and painting them with a small striping brush didn't make it easier. But I did my best. I started with base coat and then two layers of white. Then with my three colorful nail polishes I made different sized stars over my nails. 


Star Nail Art by Elins Nails

Then with a small dotting tool I made dots with the same three colors just to fill up the blank spaces. On my right hand I just made dots, didn't even dare to try painting stars with my left hand. 


The nail polishes I used -


Always start with a base coat.
White - OPI - Alpine Snow
Pink - OPI - Suzi's Hungary Again!
Blue - Nicole By OPI - My Lifesaver
Yellow - Face Stockholm - 171
Top coat - Seche Vite

Please leave a comment below about what you think about this design. 


08 April, 2013

Butterfly Nail Art

It seems like spring is finally here for real this time. I think I may have celebrated it a little to early when I said it the last time, of course it started snowing after that. But now this good weather been holding on for a while so I think it's finally time to celebrate that spring is here, for real this time.

Because of this I wanted to do something springy, and purple. That's what I had in my mind so that was what I did.

I started thinking about this design I seen everywhere on the internet already. When I think about spring I think about the flowers which starts blossoming and the animal life wakes up after the cold winter. So that's why my nails currently have a butterfly design on them.
Butterfly Nails by Elins Nails


For this design I started of with a base coat, which is a must to protect your nails. And then I made a purple gradient. I don't think I really gotten the hold of this gradient thingy, but I still keep doing it. But practice makes perfect right? I did the gradient with a make up sponge which I used to just dab the lighter purple on the darker purple.


Butterfly Nail Art by Elins Nails

Then I took a striping brush and with black nail polish I first made a curved line at the bottom of the nail. And then from the curved line I made more curved lines to the tip of the nail. After that I made some small curvy lines between the curved lines. And this is starting to sound pretty funny, loads of curved lines. Then I painted black on the tip of the nail from the small curved lines and up. With a dotting tool I made white dots on the black tip. 


This is how it looks when you see it from the right side. 


The nail polishes I used for this design is -


Don't forget the base coat. 
Darker purple - Mavala - Samarkand
Lighter Purple - OPI - You're Such A Budapest 
Black -  Isadora - Gothic Black
White - OPI - Alpine Snow
Top coat - Seche Vite

Thanks for checking out my blog, you are welcomed back anytime. 


02 April, 2013

Herringbone Nails

I hope everyone of you had a great easter. I had a great one, except I ended up with the flu which isn't that much fun.

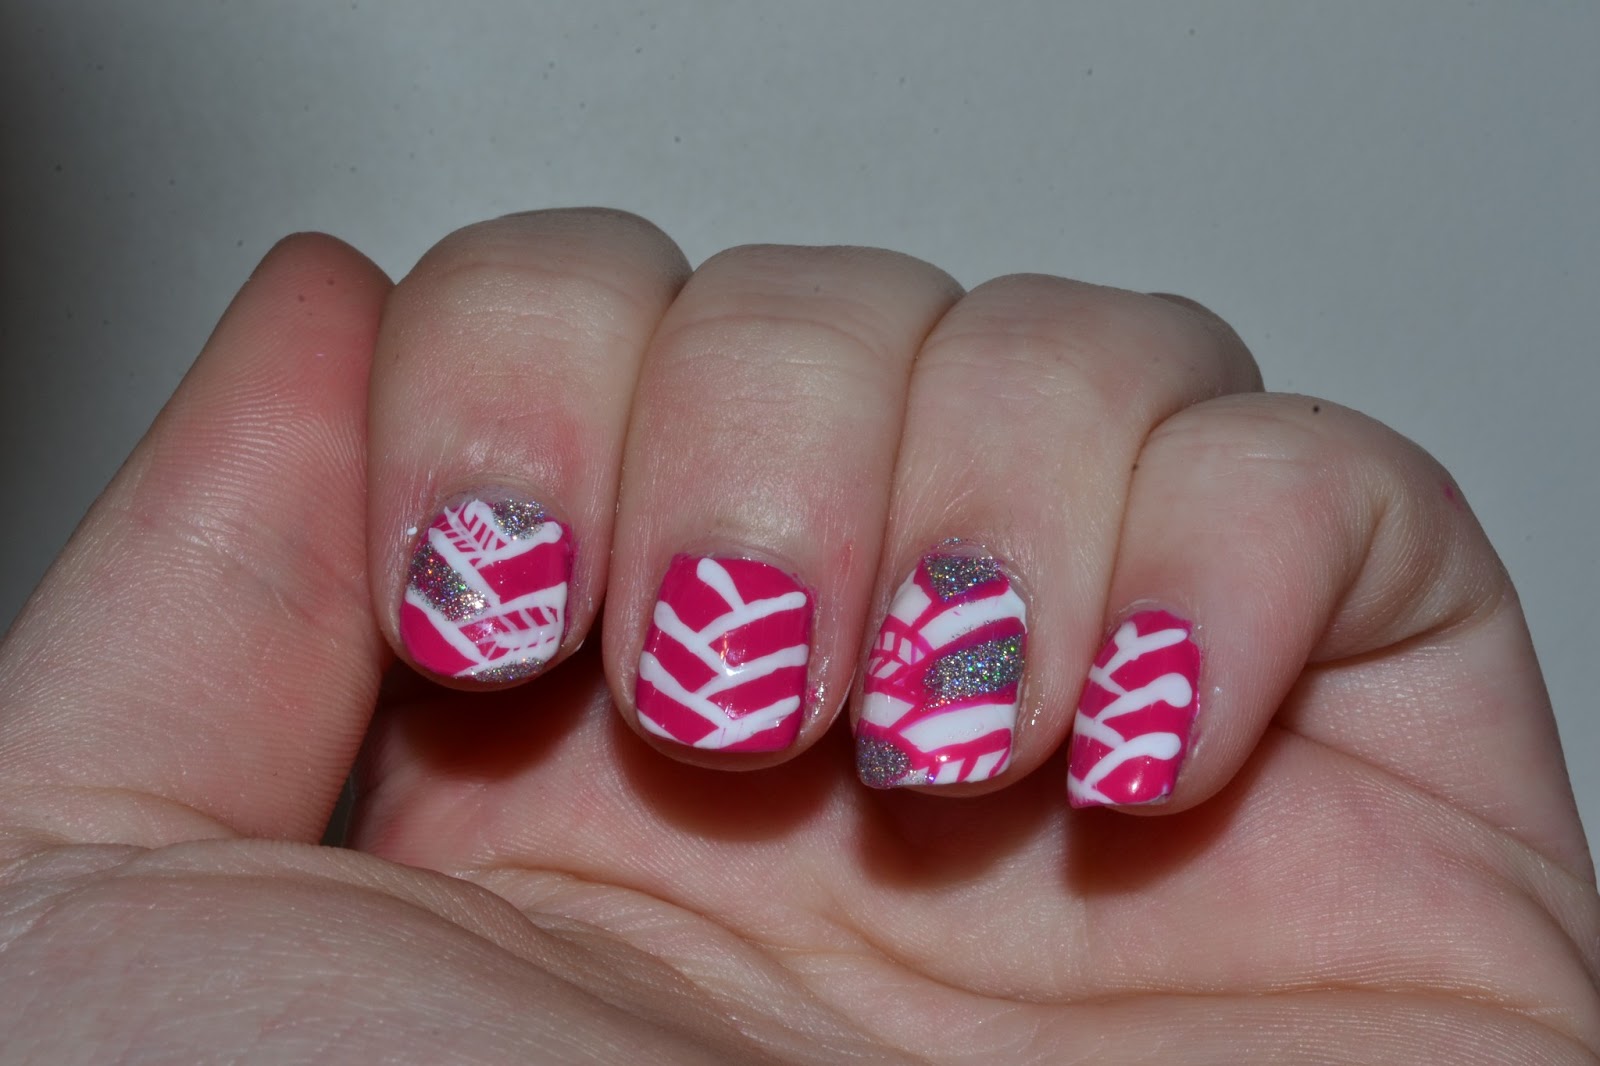
For this design I started with picking up a nail polish which I knew I wanted to use. I just got the nail polish in the mail not so long ago. I bought it online because you can't really get it here in sweden. But the brand is Nicole By OPI and it's from their Kardashian collection and it's a really barbie pink color. So I started painting my nails with this polish without having an actual plan about what I was suppose to do. Which was such a smart move from my side, or not. But in the end I decided I would do some kind of herringbone design, and it turned out pretty good if I can say so myself.

Herringbone Nails by Elins Nails

I started painting all the lines with a striping brush. My pinky didn't turn out that great, but I have to live with that. I added on white nail with pink lines instead like an accent nail. 

Herringbone Nail Art by Elins Nails

I added some glitter and some mini herringbones in the design and voila - this was the results of that. 

The nail polishes I used in this design was - 


Don't forget the important base coat when you paint your nails.
Pink - Nicole By OPI - All Kendall-ed Up
White - OPI - Alpine Snow
Glitter - Nails Inc - Abbey Road
Top Coat - Seche Vite


Please leave me a comment below, tell me what you think of the design, if you got a design you want me to do or if you simply just wanna say hey. I appreciate every single comment! 


30 March, 2013

Easter Nails - Colorful Polka Dots Nails with Gradient

I hope you all are having a great easter weekend so far. I thought I would share my second and last easter designs for this year. I wanted to do more, but unfortunately my fantasy ended here and all my ideas just reminded me of the one I already did so I thought I would draw the line here.

This design is pretty colorful, which I think is very suiting for easter. I don't know why but I see easter as a colorful holiday. This design consist of gradients and polka dots. I even did something I don't usually do, I did the nails matte. I usually wear the design a while with regular top coat and then do it matte.

Colorful Polkadot Nails by Elins Nails

I started with base coat on all the nails and then two layers of white. Then I did gradients with a different color on every nail. The gradient I did with a make up sponge which I used to dab the colors on the white nails. Then with a dotting tool I made white polka dots all over the nail. 


I think it had gave a great affect with the white polka dots with the color to white gradient. 

The nail polishes I used for this design is these -


Always use a base coat first.
White - OPI - Alpine Snow
Green - Sephora - Lime Cocktail
Purple - Rimmel - 312 Ultra Violet
Yellow - Face Stockholm - 171


Orange - Isadora - South Beach
Pink - Gina Tricot - Candyfloss
Matte Top Coat - Essie - Matte About You


Please leave a comment about the design, I would mean a lot to me.

24 March, 2013

Easter Nails

Easter is here and I'm finally allowed to do Easter design, which I love. Easter is colorful and pastel colors fit perfectly here.

For this design I started with five base colors, one for every finger. And these colors where the main colors in my design which I used the most of. Then I added two accent nail where I added some other colors.


Easter Nails by Elins Nails

I started with painting all the nails with base coat and then every nail with the base color I decided for them. I went on pretty light colors, like pastel like. I did my pinky blue on purpose to continue with the blue pinky challenge, which you can read more about in last post. The thumb that you can't see on this picture is the green polish that you can see on the rest of the nails. The three nails are then suppose to look something like an Easter egg. So with the five base colors I made some zigzag lines and straight lines with a striping brush. Then some random dots with a dotting tool. Added some white dots too to fill the empty spaces because I didn't want the to use the same color next to each other. 

Easter Nail Art by Elins Nails

On my ring finger is then suppose to be the Easter bunny. I started with painting the shape with a striping brush and then with a larger brush I filled it in. Then I did the eyes and nose with different sized dotting tools. Take notice its not skew-eyed like it usually is haha. Then I added the whiskers and then with a dotting tool I added some light pink on the cheeks and ears. 


My thumb have a little chicken on it. The body is made with dotting tools and also the eyes. The hair, neb and eggshell is made with a striping brush. 


The tons on nail polish I used for this -


Don't forget the base coat. 
My five base colors.
Green - Mavala - Pistachio
Pink - Essie - Splash Of Grenadine 
Orange - Mavala - Fresh Melon
Purple - OPI - You're Such A Budapest
Blue - China Glaze - Kinetic Candy


Brown - OPI - You Don't know Jacques
White - OPI - Alpine Snow
Black - Isadora - Gothic Black
Light Pink - Ciaté - Cutie Pie


Darker Orange - Ciaté - Speed Dial
Yellow - Ciaté - Big Yellow Taxi
Top Coat - Seche Vite 

Thanks for checking out my blog!


22 March, 2013

Golden Arrow Nails

Here comes and easy design because I strained my hand and wanted to do something I could do with one and a half hand. So this is what I ended up with. Before you look at the pictures you will probably think I'm going crazy or something or lost my color sense, but I will explain it all in the post.

I also apologize for the bad pictures, not easy to take pictures when I can't bend my wrist, haha.

Golden Arrow Nails by Elins Nails

To do this nails I started with a base coat on all the nails. Then I painted all my fingers except my ring finger and pinky golden. My ring finger wine red as an accent nail and then my pinky blue. 

On my golden finger I painted some arrow figures with wine red with a striping brush and then golden arrows on my wine red finger.  It kinda reminds me if Iron Man with these colors. 


Blue Pinky Challenge by Elins Nails


So now lets talk about my pinky. I did a blue gradient. And many problem wonders why? So let me tell you about it. There is this organization called 'Mean Stinks', and they wanna reduce the girl-on-girl bullying. That's why they have this thing called 'The Blue Pinky Challenge' with says that you are gonna paint your pinky blue. It's suppose to represent that you do a blue pinky swear to stand up for bullying and gang up for good. I thought this was a good idea and I think you all should do it. Bullying is a good problem and if no one takes care of it it will only get worse, so stand up for bullying and gang up for good. 

The nail polishes I used are these -


Don't forget base coat to protect your nails.
Wine Red - Sephora - Red Berries Smoothie 
Guld - Sephora - I'm A Rich Girl 
Blue - Ciaté - Headliner
Lighter blue - OPI - Can't find my Czechbook
Top coat - Seche Vite

Thanks for reading my blog and remember, gang up for good!