“ Elins Nails: pink
Showing posts with label pink. Show all posts

07 July, 2014

Dot Nail Art

I hope you all had a good weekend, I sure did! And now I'm back with a new set of nails for you. It's a pretty easy nail art, but it still looks so good.

Dot Nail Art by Elins Nails

This is made using dotting tools in all different sizes and some great colors. I decided to do a accent nail just to spice it up a little. 

Dot Nails by Elins Nails

I'm using my favorite nailpolish right now in this Nail Art. The golden one. It's from Gwen Stefain's OPI collect and its called Love Angel Music Baby. It's a lovely matte color, which they are calling satin. And you are not suppose to add topcoat on it, but I just think it's so amazing both without and with topcoat. I took a picture of this Nail Art before adding the topcoat so you can see for yourself. That picture you can find her below. 

Dot Nail Art without Topcoat by Elins Nails

Nailpolish -
Isadora - Second Nail
OPI - Love Angel Music Baby
Ciaté - Pepperminty
Essie - Watermelon
Seche Vite - Topcoat 

02 July, 2014

Pictorial - Flower nails.


Surprise, surprise! Here I am again! It's been a while but I'm hoping I will get back into updating my blog and painting my nails again. It's been a while but for now I'm back home from Texas for a while at least.

I thought I would do my comeback with a request that I got on the blog. She wanted to know how to do flower nails so I thought I would do that. It's an easy design, you don't need much not even a lot of experience with nail art. 

Here is the finished product of it all. 

Flower nails by Elins Nails

To do these nails I started with a gradient background so I'm gonna show how I do that too. I always start with a base coat to protect the nails. And when I do gradient nails I don't always think that the color is really compact so I start with a white base coat to start it all off. 


Then you take nailpolish that is often the same color but different shades. For this design I used 3 different blue polishes. Then you get a make-up sponge. These I bought really cheap so you don't have to spend a lot of money on that.


So to do the gradient you put the polishes on your sponge after how the shades go. You need a few layers of the colors because the sponge soaks up a lot of the nail polish.


Then you just put it over your nails. But you have to think about the fact that you don't only get nailpolish on your nail. You can always put tape around your nails or put vaseline around your nail to get an easier clean up. 


After it should look something like this, and you have to put in mind that once you get your topcoat on it will look much better. 


After you are done with the gradient background its time for the flowers. To do them you need to shades of another color, I chose pink. You start with the darker shade and a pretty big dotting tool.


Then you do some dots on your nail. I usually keep them kinda round but still not. Just look at the picture to see what I mean.


After that you take your lighter color and thin nail art brush.


With the lighter shade you do some patterns over your spots, almost like Cs.


For the leaves you take a bigger brush and a green nailpolish.


You just make some leaf shapes around the flowers. I usually try to do 2 leaves for every flower but you have to keep in mind that it's not always possible.


Put some topcoat and some clean up and you are all done!


I'm seeing now that the light on the pictures aren't the best, it's sort of reflecting on the nails. It's been a while since I took pictures of my nails but it will be better next time!

Thanks for looking into my blog and hopefully you will pay another visit soon. I'm gonna try to update a few more things for you in the near future. 

23 August, 2013

Galaxy Nail Art - My nails are out of this world

Today I thought I would share this galaxy Nail Art which I made. I'm pretty satisfied with these nails, except for the fact that the glitter I put on top of it was to compact. Which I didn't really know before. But other then that its a pretty easy design all you need is some cool nailpolishes and a make up sponge and then you are good to go.


Galaxy nails by Elins Nails


To do this design I started with two layers of a dark blue with a little bit of shimmer in it. Then with a make up sponge I put on a little pink, a light blue and then at last purple. Then to top it all of and give it that 'Out of this world' feeling I added some holographic topcoat. 


Then with a white striping nailpolish I made some stars on and then made some smaller stars with a dotting tool. And then I did that thing I regret the most, I wanted more glitter so I grabbed this new glitter striping nailpolish and made some random things on the nail. Lucky me it didn't look so bad in real. 

To end it all I added a layer of topcoat, to just put the finish touch on it. Making it all smooth and shiny.


 The nailpolishes I used for this design is these - 


Base coat - Isadora - Second Nail
Dark Blue - China Glaze - Up All Night
Pink - Essie - Cute As A Button
Light Blue - China Glaze - Flyin' High
Purple - Mavala - Samarkand
White - Kiss Nail Art
Glitter - Kiss Nail Art

And then I realized I forgot the top coats I used -

Holographic - Ciaté - Halo
Top Coat - Seche Vite 


Please leave a comment saying what you think about this design, thanks.

12 August, 2013

Ciaté Metallic Foil Nails

For these designs I used a method I haven't used before but it was pretty easy and I like the results of it.

Metallic Foil Nails by Elins Nails

For this I used the 'Very Colourfoil Manicure' kit from Ciaté.

Ciaté - Very Colourfoil Manicure

Foil Manicure supplies by Elins Nails

The kit includes a nail polish - Kiss Chase, Foil Fix (glue) and small pieces of what I guess we should call the Foil. 


Foil Manicure by Elins Nails


For this you start with base coat as normally to protect your nails. Then you put two layers of the nail polish which was included in the kit. When its completely dry you put some foil fix on some random spots on the nails and then put the foil paper on, just press it first and pull it off quickly. Then you just repeat putting on more foil until you are completely satisfied. Then finish with a coat of top coat. Super easy!


Foil Manicure by Elins Nails

It's an easy method and it gives an great results without having to have loads of experience and time to make it super carefully. I think this is a great method where you can be a little sloppy but will still get a great design. 


31 July, 2013

Swatch - MIYO Summer Flower

Since I don't have a design to show you today I wanna share a swatch of a nail polish that I got in present not so long ago. I got it when I took my drivers license actually!

The brand is MIYO and the color is called Summer Flower.

MIYO Summer Flower Swatch by Elins Nails

MIYO Summer Flower by Elins Nails

It's a very pretty pink cream polish. It had a great formula and looked great with two coats. 


MIYO Summer Flower Swatch by Elins Nails

The special thing about this nail polish is that it's scented. I guess it's suppose to smell like summer flowers because of the name. It smells great and I was smelling my nails non stop when I had it one, which sounds a little creepy. 


28 July, 2013

Golden Polkadot Half Moon Nails

I thought it was time for me to do my first half moon manicure so that is what I did for todays design. The name half moon manicure comes from the fact that you paint a half moon looking figure on the bottom of your nails.


Golden polkadot Half Moon Nails


To do this nails I started with painting the whole nail pink and then with a brush I added the gold half moon. Then to make it a little funnier I added some polka dots. 


Golden Polkadot Half Moon Nail Art by Elins Nails

Then I ended it all with a matte top coat, just because I love making nail polish with glitter matte. 

The nail polishes I used -


Base coat - Isadora - Second Nail
Pink - MIYO - Summer Flower 
Gold - Sephora - I'm A Rich Girl
Matte Top Coat - Essie - Matte About You


Please tell me what you think about the design! Did I succeed my first half moon manicure? Leave a comment below.  

27 July, 2013

Tribal Nails

Sorry for not updating in a while. Been working, been on vacation and just been general lazy. I haven't even painted my nails in so long which isn't alike me at all.

But now I'm back and I'm back with a tribal printed nail art. Some girl even asked me if they were stickers when I was out shopping. I guess that's something good, haha.

Tribal Nail Art by Elins Nails

I know the lines aren't the straightest lines and the cleanest clean up, but it's what I got for you today. For this design I used a striping brush and a dotting tool.

The nail polishes I used for this design -

 Don't forget base coat to protect your nails.

White - OPI - Alpine Snow
Pink - Essie - Watermelon
Blue/Green - Essie - Turquoise & Caicos


Black - Isadora - Gothic Black
Purple - H&M - Lilac Plum
Top coat - Seche Vite

Sorry for being away so much, but I will try to make it better for you!

29 May, 2013

Cartoon Nails

Been really busy with school the last few days. But now graduation is just around the corner so hopefully I will have to update the blog more often from now on. This post wont be so long because I don't even have a proper picture of this design. So you have to be satisfied with a cell phone picture, taken before clean up. Soooorry.

They are suppose to look like nails from cartoons.


To do this nail I started with base coat. Then I painted two layers of pink nail polish. With a striping brush I painted the black on the nails edges. With the same brush I added some white thingy on the nail to be a reflection. 

Sorry for the bad post and I hope you forgive me for this!

03 May, 2013

Cherry Blossom Tree Nail Art

Here comes a fast post, because I'm exhausted after a long day. If I'm gonna be honest I only painted one hand so I could show you all here on the blog. I apologize for the pictures here in forehand because I been playing badminton all evening and my arm is tired. Could barely hold the camera still because my arm was shaking so much, haha.


Todays design is a cherry blossom design. I'm pretty satisfied with it, it looks cool.

Cherry Blossom Tree Nail Art by Elins Nails

To to this I started with base coat and then two layers of a light blue nail polish. Then with a striping brush I painted some branches. Then with dotting tools I first made dark pink dots on the branches and then lighter pink dots around that. Then I just finished it off with a top coat to smooth everything down and make it shiny and pretty. 

The nail polishes I used for this design -


Always use a base coat too.
Blue - China Glaze - Kinetic Candy
Light Pink - Gina Tricot - Candyfloss
Darker Pink - H&M - City
Top coat - Seche Vite

 Thanks for paying a visit to my little world of nail polish. 


29 April, 2013

Star Nail Art - Twinkle Twinkle Little Star

The nails I wanna show you today came into my nails when I was home sick with a bad cold and fever. I was feeling down and just needed some color to cheer me up. So colorful nails was what I wanted. The design wasn't the easiest design and it didn't make it better that all my nails are so short. They all broke when I wasn't wearing nail polish for a week, shame on me.

Star Nails by Elins Nails

Painting stars aren't my biggest talent let me tell you that, and painting them with a small striping brush didn't make it easier. But I did my best. I started with base coat and then two layers of white. Then with my three colorful nail polishes I made different sized stars over my nails. 


Star Nail Art by Elins Nails

Then with a small dotting tool I made dots with the same three colors just to fill up the blank spaces. On my right hand I just made dots, didn't even dare to try painting stars with my left hand. 


The nail polishes I used -


Always start with a base coat.
White - OPI - Alpine Snow
Pink - OPI - Suzi's Hungary Again!
Blue - Nicole By OPI - My Lifesaver
Yellow - Face Stockholm - 171
Top coat - Seche Vite

Please leave a comment below about what you think about this design. 


02 April, 2013

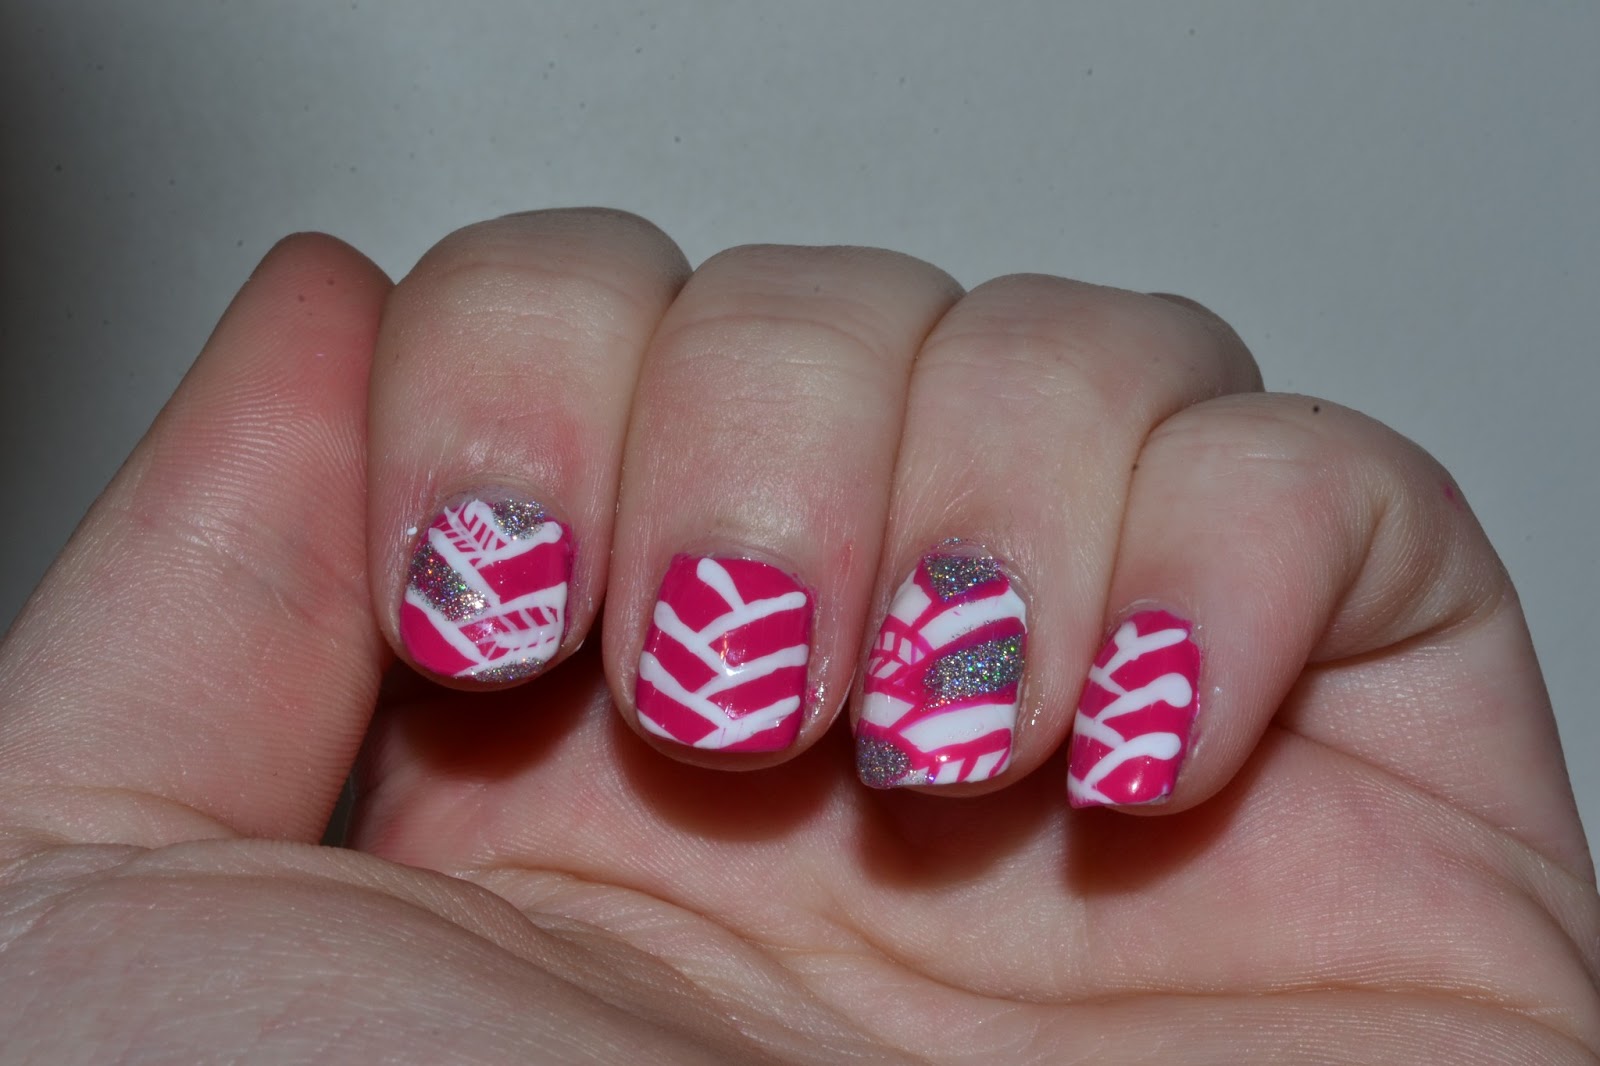
Herringbone Nails

I hope everyone of you had a great easter. I had a great one, except I ended up with the flu which isn't that much fun.

For this design I started with picking up a nail polish which I knew I wanted to use. I just got the nail polish in the mail not so long ago. I bought it online because you can't really get it here in sweden. But the brand is Nicole By OPI and it's from their Kardashian collection and it's a really barbie pink color. So I started painting my nails with this polish without having an actual plan about what I was suppose to do. Which was such a smart move from my side, or not. But in the end I decided I would do some kind of herringbone design, and it turned out pretty good if I can say so myself.

Herringbone Nails by Elins Nails

I started painting all the lines with a striping brush. My pinky didn't turn out that great, but I have to live with that. I added on white nail with pink lines instead like an accent nail. 

Herringbone Nail Art by Elins Nails

I added some glitter and some mini herringbones in the design and voila - this was the results of that. 

The nail polishes I used in this design was - 


Don't forget the important base coat when you paint your nails.
Pink - Nicole By OPI - All Kendall-ed Up
White - OPI - Alpine Snow
Glitter - Nails Inc - Abbey Road
Top Coat - Seche Vite


Please leave me a comment below, tell me what you think of the design, if you got a design you want me to do or if you simply just wanna say hey. I appreciate every single comment! 


30 March, 2013

Easter Nails - Colorful Polka Dots Nails with Gradient

I hope you all are having a great easter weekend so far. I thought I would share my second and last easter designs for this year. I wanted to do more, but unfortunately my fantasy ended here and all my ideas just reminded me of the one I already did so I thought I would draw the line here.

This design is pretty colorful, which I think is very suiting for easter. I don't know why but I see easter as a colorful holiday. This design consist of gradients and polka dots. I even did something I don't usually do, I did the nails matte. I usually wear the design a while with regular top coat and then do it matte.

Colorful Polkadot Nails by Elins Nails

I started with base coat on all the nails and then two layers of white. Then I did gradients with a different color on every nail. The gradient I did with a make up sponge which I used to dab the colors on the white nails. Then with a dotting tool I made white polka dots all over the nail. 


I think it had gave a great affect with the white polka dots with the color to white gradient. 

The nail polishes I used for this design is these -


Always use a base coat first.
White - OPI - Alpine Snow
Green - Sephora - Lime Cocktail
Purple - Rimmel - 312 Ultra Violet
Yellow - Face Stockholm - 171


Orange - Isadora - South Beach
Pink - Gina Tricot - Candyfloss
Matte Top Coat - Essie - Matte About You


Please leave a comment about the design, I would mean a lot to me.