Elins Nails: April 2013

29 April, 2013

Star Nail Art - Twinkle Twinkle Little Star

The nails I wanna show you today came into my nails when I was home sick with a bad cold and fever. I was feeling down and just needed some color to cheer me up. So colorful nails was what I wanted. The design wasn't the easiest design and it didn't make it better that all my nails are so short. They all broke when I wasn't wearing nail polish for a week, shame on me.

Star Nails by Elins Nails

Painting stars aren't my biggest talent let me tell you that, and painting them with a small striping brush didn't make it easier. But I did my best. I started with base coat and then two layers of white. Then with my three colorful nail polishes I made different sized stars over my nails. 


Star Nail Art by Elins Nails

Then with a small dotting tool I made dots with the same three colors just to fill up the blank spaces. On my right hand I just made dots, didn't even dare to try painting stars with my left hand. 


The nail polishes I used -


Always start with a base coat.
White - OPI - Alpine Snow
Pink - OPI - Suzi's Hungary Again!
Blue - Nicole By OPI - My Lifesaver
Yellow - Face Stockholm - 171
Top coat - Seche Vite

Please leave a comment below about what you think about this design. 


23 April, 2013

Justin Bieber Nail Art - Tribal Print

Been really busy in school lately so you all have to excuse my absence from the blog. These nails I'm gonna show you I made in a really hurry late evening. Because the day after I was leaving home at 4 am to go and start queuing for the Justin Bieber concert, and I just had to have nice nails for the occasion.

Justin Bieber Nails by Elins Nails

Its a pretty easy design. I just painted all the nails except one black and the last one gold for an accent nail. On the black nails I took a striping brush and a small dotting tool and made gold tribal prints on it. On the accent nail I did my best to write Justin Bieber. 

This was all for now, and I'm praying I will get more time for my nails and the blog in the future. 


08 April, 2013

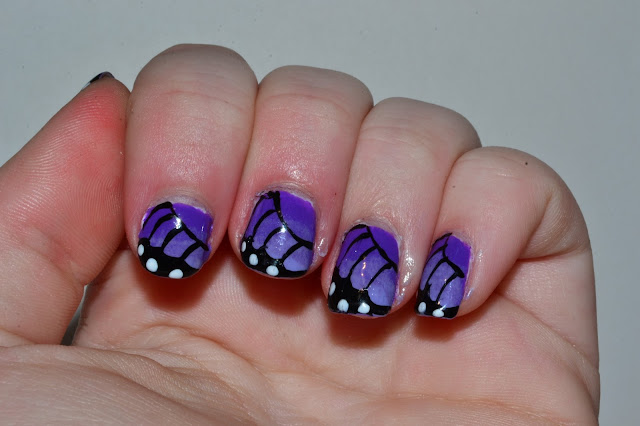
Butterfly Nail Art

It seems like spring is finally here for real this time. I think I may have celebrated it a little to early when I said it the last time, of course it started snowing after that. But now this good weather been holding on for a while so I think it's finally time to celebrate that spring is here, for real this time.

Because of this I wanted to do something springy, and purple. That's what I had in my mind so that was what I did.

I started thinking about this design I seen everywhere on the internet already. When I think about spring I think about the flowers which starts blossoming and the animal life wakes up after the cold winter. So that's why my nails currently have a butterfly design on them.
Butterfly Nails by Elins Nails


For this design I started of with a base coat, which is a must to protect your nails. And then I made a purple gradient. I don't think I really gotten the hold of this gradient thingy, but I still keep doing it. But practice makes perfect right? I did the gradient with a make up sponge which I used to just dab the lighter purple on the darker purple.


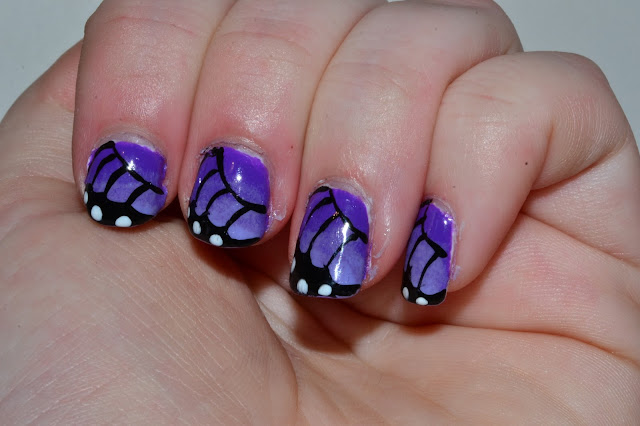
Butterfly Nail Art by Elins Nails

Then I took a striping brush and with black nail polish I first made a curved line at the bottom of the nail. And then from the curved line I made more curved lines to the tip of the nail. After that I made some small curvy lines between the curved lines. And this is starting to sound pretty funny, loads of curved lines. Then I painted black on the tip of the nail from the small curved lines and up. With a dotting tool I made white dots on the black tip. 


This is how it looks when you see it from the right side. 


The nail polishes I used for this design is -


Don't forget the base coat. 
Darker purple - Mavala - Samarkand
Lighter Purple - OPI - You're Such A Budapest 
Black -  Isadora - Gothic Black
White - OPI - Alpine Snow
Top coat - Seche Vite

Thanks for checking out my blog, you are welcomed back anytime. 


02 April, 2013

Herringbone Nails

I hope everyone of you had a great easter. I had a great one, except I ended up with the flu which isn't that much fun.

For this design I started with picking up a nail polish which I knew I wanted to use. I just got the nail polish in the mail not so long ago. I bought it online because you can't really get it here in sweden. But the brand is Nicole By OPI and it's from their Kardashian collection and it's a really barbie pink color. So I started painting my nails with this polish without having an actual plan about what I was suppose to do. Which was such a smart move from my side, or not. But in the end I decided I would do some kind of herringbone design, and it turned out pretty good if I can say so myself.

Herringbone Nails by Elins Nails

I started painting all the lines with a striping brush. My pinky didn't turn out that great, but I have to live with that. I added on white nail with pink lines instead like an accent nail. 

Herringbone Nail Art by Elins Nails

I added some glitter and some mini herringbones in the design and voila - this was the results of that. 

The nail polishes I used in this design was - 


Don't forget the important base coat when you paint your nails.
Pink - Nicole By OPI - All Kendall-ed Up
White - OPI - Alpine Snow
Glitter - Nails Inc - Abbey Road
Top Coat - Seche Vite


Please leave me a comment below, tell me what you think of the design, if you got a design you want me to do or if you simply just wanna say hey. I appreciate every single comment!