Elins Nails: July 2013

31 July, 2013

Swatch - MIYO Summer Flower

Since I don't have a design to show you today I wanna share a swatch of a nail polish that I got in present not so long ago. I got it when I took my drivers license actually!

The brand is MIYO and the color is called Summer Flower.

MIYO Summer Flower Swatch by Elins Nails

MIYO Summer Flower by Elins Nails

It's a very pretty pink cream polish. It had a great formula and looked great with two coats. 


MIYO Summer Flower Swatch by Elins Nails

The special thing about this nail polish is that it's scented. I guess it's suppose to smell like summer flowers because of the name. It smells great and I was smelling my nails non stop when I had it one, which sounds a little creepy. 


30 July, 2013

Sunset Inspired Nails - including glitter and studs.

Today I wanted to do a gradient, and because of all the beautiful sunsets right now I let my gradient be inspired by that. I don't know if it turned out the way I hoped, but I'm pretty satisfied with it anyways and think it ended up pretty good and thats what counts doesn't it?


For this design I have three different orange colors. I started with base coat and then two coats of the lightest orange color. Then to do the gradient I took a make up sponge and painted all the three shades of orange on it. You have to put on quite a few layers because the sponge takes in a lot of the nail polish. Then I just dabbed it on the nail. Did this a few times letting it dry between to get the results that I wanted. 

It was the first time I did a gradient like this and I'm pretty happy about how it turned out. The only thing I think I didn't do so good was the I dabbed it to low on the nail and it didn't get so much of the lightest color in the end. But practice makes perfect and I'm sure I will think about that the next time I do a gradient.


To make it all a little funnier I added a holographic top coat on it. Then to make it a little special I wanted to make a fun accent nail. So I went though my boxes and found some studs I never used. The first one I put on I just put on the the wet top coat. But then I thought it would probably look better if I added some more studs. But by then the top coat had dried and I had to use some glue. And to just sum it up it didn't end so well which you can probably notice. But my favorite saying is practice makes perfect so I will just stick with that now too. 

The nail polish I used for this -


Base coat - Isadora - Second Nail
Lightest orange - Mavala - Fresh Melon
Middle Orange - Isadora - South Beach 
Darkest Orange - Ciaté - Speed Dial
Holographic top coat - Ciaté - Halo
Top coat - Seche Vite 

Please tell me what you think about this design, I love to hear it!


29 July, 2013

Nails inspired by art by Keith Haring.

Trying to come up with new design I looked through my memory to find some thing to get inspired from. Then I remembered this artist that we talked about in art class years ago. I remember he had some cool theme through his works. My problem were just that I didn't remember his name. So I spent some time searching through the world of internet and then I found it. The artist was Keith Haring. So here comes the results of my nails inspired by Keith Haring.

Keith Haring Nail Art by Elins Nails

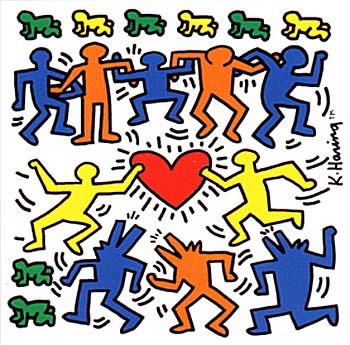
This is the work that inspired my nails.


Close up - Keith Haring Nail Art by Elins Nails


To do this nails I started of with a coat base coat and then two coats of white. Then I used a thin brush to paint all the characters and then with a striping brush I did all the black lines around them. The heart I did with a dotting tool though. Topped it off with a top coat and its done!

Keith Haring Dog Nail Art by Elins Nails

Giving you a picture of my thumb too, just because I'm feeling generous. But it looks a little weird though haha. 


The nail polishes I used - 


Base coat - Isadora - Second Nail
White - OPI - Alpine Snow
Orange - Isadora - South Beach
Red - Gina Tricot - Formula One


Yellow - Face Stockholm - 171
Blue - China Glaze - First Mate
Green - Sephora - Picnic In The Park
Black - Isadora - Gothic Black 
Top coat - Seche Vite


Thanks for looking in here and I hope you liked what you saw. 


28 July, 2013

Golden Polkadot Half Moon Nails

I thought it was time for me to do my first half moon manicure so that is what I did for todays design. The name half moon manicure comes from the fact that you paint a half moon looking figure on the bottom of your nails.


Golden polkadot Half Moon Nails


To do this nails I started with painting the whole nail pink and then with a brush I added the gold half moon. Then to make it a little funnier I added some polka dots. 


Golden Polkadot Half Moon Nail Art by Elins Nails

Then I ended it all with a matte top coat, just because I love making nail polish with glitter matte. 

The nail polishes I used -


Base coat - Isadora - Second Nail
Pink - MIYO - Summer Flower 
Gold - Sephora - I'm A Rich Girl
Matte Top Coat - Essie - Matte About You


Please tell me what you think about the design! Did I succeed my first half moon manicure? Leave a comment below.  

27 July, 2013

Tribal Nails

Sorry for not updating in a while. Been working, been on vacation and just been general lazy. I haven't even painted my nails in so long which isn't alike me at all.

But now I'm back and I'm back with a tribal printed nail art. Some girl even asked me if they were stickers when I was out shopping. I guess that's something good, haha.

Tribal Nail Art by Elins Nails

I know the lines aren't the straightest lines and the cleanest clean up, but it's what I got for you today. For this design I used a striping brush and a dotting tool.

The nail polishes I used for this design -

 Don't forget base coat to protect your nails.

White - OPI - Alpine Snow
Pink - Essie - Watermelon
Blue/Green - Essie - Turquoise & Caicos


Black - Isadora - Gothic Black
Purple - H&M - Lilac Plum
Top coat - Seche Vite

Sorry for being away so much, but I will try to make it better for you!

13 July, 2013

Black and white Nail Art

Today I wanna share an easy design. Not the most colorful one but I like it. Looks kinda cool according to me.

Black and White Nail Art by Elins Nails

To do this design I started with a base coat as usually. Then I painted two layers of black. Once it was completely dry I freehand painted with a thin brush and then added some dots with a dotting tool just to make it a little prettier. 

Black And White Nails By Elins Nails

Then I just added a layer of top coat for the finishing touch. 

The nail polishes I used -


Don't forget to base coat to protect your nails. 
Black - Isadora - Gothic Black
Vit - OPI - Alpine Snow
Top coat - Seche Vite

Thank you for checking in, and I would love if you left a comment for me. Requesting a design or just letting me now what you think of this one!