“ Elins Nails

25 October, 2013

Texas Nail Art

I have since a few months back worked on becoming an Au Pair in the US, and last week I finally found my host family. So in less then a month I will be going to Texas to work as an Au Pair there for the next year. My updating might be really bad during that time but I will try to update some. So to celebrate this I did Texas nails, with the Texas flag. And I know the flag is wrong for this angle but from my angle the flag is right. So you just have to imagine it or turn your computer upside down or something.


To do this nails I started with base coat and then two layers of white. Then with the red nail polish I painted half the nail, using the nail polish bottle brush. Then with a pretty thin brush I painted the blue on freehand. 


Then I thought about painting white stars on the blue but then I decided to just use some star charms on instead. Taking the easy way out. 


The Nail polishes I used are these -
Don't forget to use base coat to protect your nails.


White - OPI - Alpine Coat
Blue - China Glaze - First Mate
Red - Gina Tricot - Formula One
Top Coat - Nails Inc - Caviar Top Coat


19 September, 2013

Jeans Nail Art - Wear Your Nails

The nails I wanna show you now is inspired by jeans. I bought this jeans affect nail polish not so long ago and I haven't tried it before so I thought now it was time that I did!


When I did these nails I started with base coat which is always a most. Then I put two layers of the demin effect nail polish on. Then with a striping brush and gold nail polish I did small lines in different patterns to look like the stitches that you find on the jeans. 


It was an easy design but it looks pretty good according to me. And I just wanna point out that it's not tipwear on the pinky. It kinda looks like that but it's gold nail polish there. Just had to get that out haha. 
I did these nails matte because I thought that brought out the jeans look more. 

I have been a little bad with my nail care the last few weeks so I know it looks so bad, but I'm gonna take better care of it now haha. I promise you all that! 


 The nail polishes I used -


Base coat - Isadora - Second Nail
Denim - Kubiss - Denim Nail Affect
Gold - Sephora - I'm A Rich Girl
Matte top coat - Essie - Matte About You

Please leave me a comment to let me know what you think about this design. 


23 August, 2013

Galaxy Nail Art - My nails are out of this world

Today I thought I would share this galaxy Nail Art which I made. I'm pretty satisfied with these nails, except for the fact that the glitter I put on top of it was to compact. Which I didn't really know before. But other then that its a pretty easy design all you need is some cool nailpolishes and a make up sponge and then you are good to go.


Galaxy nails by Elins Nails


To do this design I started with two layers of a dark blue with a little bit of shimmer in it. Then with a make up sponge I put on a little pink, a light blue and then at last purple. Then to top it all of and give it that 'Out of this world' feeling I added some holographic topcoat. 


Then with a white striping nailpolish I made some stars on and then made some smaller stars with a dotting tool. And then I did that thing I regret the most, I wanted more glitter so I grabbed this new glitter striping nailpolish and made some random things on the nail. Lucky me it didn't look so bad in real. 

To end it all I added a layer of topcoat, to just put the finish touch on it. Making it all smooth and shiny.


 The nailpolishes I used for this design is these - 


Base coat - Isadora - Second Nail
Dark Blue - China Glaze - Up All Night
Pink - Essie - Cute As A Button
Light Blue - China Glaze - Flyin' High
Purple - Mavala - Samarkand
White - Kiss Nail Art
Glitter - Kiss Nail Art

And then I realized I forgot the top coats I used -

Holographic - Ciaté - Halo
Top Coat - Seche Vite 


Please leave a comment saying what you think about this design, thanks.

21 August, 2013

Perfect Clean Up after painting your nails.

Everyone knows its not the most easiest thing to paint your nails perfectly, but what makes them look perfect is the perfect clean up, not only from nail polish outside your nails but also to get perfect line around your cuticles. To do this there are a few different techniques which I thought I would show you today.


The first thing is that you can use cotton swabs (q-tips) dipped in nail polish remover. But this is probably just best if you got nail polish outside your nails. It's not the easiest thing to get the perfect clean up around your cuticle with a cotton swab though.

The next thing is a nail polish correction pen. I used one for the swedish store Kicks, from their own brand.

Kicks Nail Polish Corrector by Elins Nails

Its like a pen full with nail polish remover. Its a good and easy way to get a good clean up. But the downsides which I found about this is that the tips easy broke and got ugly. But luckily you usually get a few extra tips with. These pens are available from OPI and Essie too that I know of at least. 

But after trying all different ways this next thing is my favorite. I use an angled eyeshadow brush that I bought pretty cheap. 


Just dip it in nail polish remover and its great for the clean up around your cuticle. To get the best looking nails it looks best if you clean so the nail polish don't really go all the way down to the cuticles. 

I hope this helps you all to get the perfect clean up!

18 August, 2013

Depends Nail Care Kit.

On todays post I wanna talk about a Nail Care kit made by Depend which is a swedish brand which you can find mostly in Sweden, Denmark and Norway. Mostly know for their mini polishes and nail care products.

This is a kit that I bought not so long ago. It includes Avocado oil, Cuticle peeling and Cuticle cream.

Depends Nail Care by Elins Nails

Since I bought this kit I have been using it once a week. It does take some time but so far I think it's worth it because of the results I noticed so far. I think my cuticle which haven't been in the best shape are looking so much better. 

And on top of it all I think my nails are growing faster, which makes sense since that they grow faster when the nails are feeling better. That must be a good grade for it, don't you think? 


This was my nails in the beginning after a using it for a while. 


And this was my nails a while back, the only picture I could find right now but my cuticle was in a much worse state in between this picture. 

So this is something I recommend for those who can get your hands on it. 

15 August, 2013

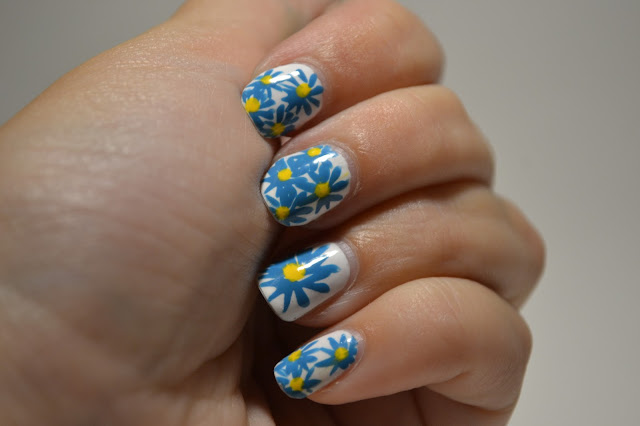
Blue and Yellow Flower Nails - Inspired by a book

Blue and Yellow Flower Nails by Elins Nails


Today my design is inspired by a book. This is what happened when I am out of ideas and look for inspiration around me. I looked through my book shelf's to find a book with a cool cover you could make a great design out of. After a while I found one and this is the results of that.


The book I got inspired by is this book 'The Summer I Turned Pretty'. It's a great book by Jenny Han, which I recommend to all teen girls out there. 


The Summer I Turned Pretty by Elins Nails


To do this design I started with a base coat and then two layers of white. Then to make it pretty easy for me I used a dotting tool and started making yellow dots over the nails. Then with a striping brush I made blue stripes from the yellow dots. I didn't do them perfectly because I thought it brought a little charm to it. Then I added another yellow dot over the old dot to hide those blue stripes that came over the yellow dot. 


On my ring finger I only made one a little bigger flower to make it some kind of accent nail. 


The nail polish I used of this is -


Base coat - Isadora - Second Nail
White - Nail Girls - Snow White Tips
Blue - China Glaze - Flyin' High
Yellow - Face Stockholm - 171
Top coat - Nails Inc - Caviar Top Coat


Thank you for checking in and please do it again!


12 August, 2013

Ciaté Metallic Foil Nails

For these designs I used a method I haven't used before but it was pretty easy and I like the results of it.

Metallic Foil Nails by Elins Nails

For this I used the 'Very Colourfoil Manicure' kit from Ciaté.

Ciaté - Very Colourfoil Manicure

Foil Manicure supplies by Elins Nails

The kit includes a nail polish - Kiss Chase, Foil Fix (glue) and small pieces of what I guess we should call the Foil. 


Foil Manicure by Elins Nails


For this you start with base coat as normally to protect your nails. Then you put two layers of the nail polish which was included in the kit. When its completely dry you put some foil fix on some random spots on the nails and then put the foil paper on, just press it first and pull it off quickly. Then you just repeat putting on more foil until you are completely satisfied. Then finish with a coat of top coat. Super easy!


Foil Manicure by Elins Nails

It's an easy method and it gives an great results without having to have loads of experience and time to make it super carefully. I think this is a great method where you can be a little sloppy but will still get a great design.