“ Elins Nails: red
Showing posts with label red. Show all posts

07 July, 2014

Dot Nail Art

I hope you all had a good weekend, I sure did! And now I'm back with a new set of nails for you. It's a pretty easy nail art, but it still looks so good.

Dot Nail Art by Elins Nails

This is made using dotting tools in all different sizes and some great colors. I decided to do a accent nail just to spice it up a little. 

Dot Nails by Elins Nails

I'm using my favorite nailpolish right now in this Nail Art. The golden one. It's from Gwen Stefain's OPI collect and its called Love Angel Music Baby. It's a lovely matte color, which they are calling satin. And you are not suppose to add topcoat on it, but I just think it's so amazing both without and with topcoat. I took a picture of this Nail Art before adding the topcoat so you can see for yourself. That picture you can find her below. 

Dot Nail Art without Topcoat by Elins Nails

Nailpolish -
Isadora - Second Nail
OPI - Love Angel Music Baby
Ciaté - Pepperminty
Essie - Watermelon
Seche Vite - Topcoat 

05 July, 2014

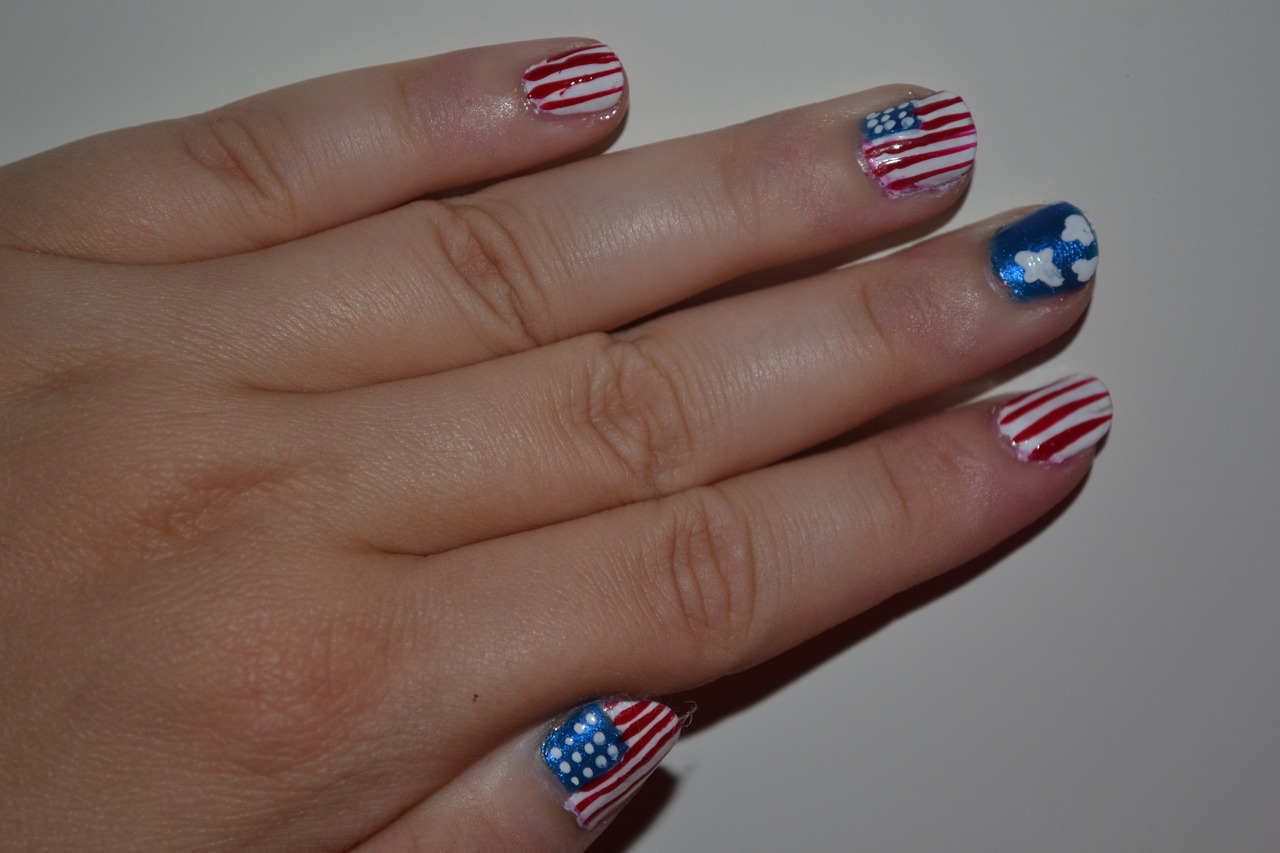
Patriotic 4th of July Nails

Over there in the big country across the Atlantic Ocean the holiday 4th Of July is being celebrated. Although I'm not living there anymore I just had to join in on these celebrations, and it's kinda started to become a tradition for me to celebrate this holiday with some great nail art. So why break it now? I'm still hoping I will get a chance to celebrate 4th of July right there in America, hopefully in Texas, but this will have to do until that day when I actually will do so. 

I was in a kinda glittery mood when I chose out the colors for this design, so its a nail art full of glitter! Since glitter nail polish isn't always super compact I started of with a layer of white nail polish to have a base for all the glitter that is in this. 

Patriotic 4th of July Nails by Elins Nails.

The design is pretty easy, not much tools where used for this patriotic Nail Art. Everything but the stripes and dots are made with the brush in the nail polish. I guess you can even say that the stripes was made with that too because I was using a striping nail polish - very thin brush in the nail polish. 

For this I did 3 nails with both blue, red, stripes and dots. The stars had to become dots because I'm really not that good to make that small stars. The third one that you can't see on the picture is obviously the thumb. The two other nails I did concentrate on one of the colors. Since the blue polish I was using was more glitter then color, compared to the red one, I did a glitter gradient. Then with the smallest dotting tool I have I added dots over it. With the red one I did the whole nail and the added stripes. 

Patriotic 4th of July Nail Art by Elins Nails

I hope you liked the Patriotic 4th Of July Nails! For everyone other there that is celebrating it today, what have been your plans for the days? I'm pretty curious to know, so if anyone got something exciting to share please leave a comment for me!

25 October, 2013

Texas Nail Art

I have since a few months back worked on becoming an Au Pair in the US, and last week I finally found my host family. So in less then a month I will be going to Texas to work as an Au Pair there for the next year. My updating might be really bad during that time but I will try to update some. So to celebrate this I did Texas nails, with the Texas flag. And I know the flag is wrong for this angle but from my angle the flag is right. So you just have to imagine it or turn your computer upside down or something.


To do this nails I started with base coat and then two layers of white. Then with the red nail polish I painted half the nail, using the nail polish bottle brush. Then with a pretty thin brush I painted the blue on freehand. 


Then I thought about painting white stars on the blue but then I decided to just use some star charms on instead. Taking the easy way out. 


The Nail polishes I used are these -
Don't forget to use base coat to protect your nails.


White - OPI - Alpine Coat
Blue - China Glaze - First Mate
Red - Gina Tricot - Formula One
Top Coat - Nails Inc - Caviar Top Coat


29 July, 2013

Nails inspired by art by Keith Haring.

Trying to come up with new design I looked through my memory to find some thing to get inspired from. Then I remembered this artist that we talked about in art class years ago. I remember he had some cool theme through his works. My problem were just that I didn't remember his name. So I spent some time searching through the world of internet and then I found it. The artist was Keith Haring. So here comes the results of my nails inspired by Keith Haring.

Keith Haring Nail Art by Elins Nails

This is the work that inspired my nails.


Close up - Keith Haring Nail Art by Elins Nails


To do this nails I started of with a coat base coat and then two coats of white. Then I used a thin brush to paint all the characters and then with a striping brush I did all the black lines around them. The heart I did with a dotting tool though. Topped it off with a top coat and its done!

Keith Haring Dog Nail Art by Elins Nails

Giving you a picture of my thumb too, just because I'm feeling generous. But it looks a little weird though haha. 


The nail polishes I used - 


Base coat - Isadora - Second Nail
White - OPI - Alpine Snow
Orange - Isadora - South Beach
Red - Gina Tricot - Formula One


Yellow - Face Stockholm - 171
Blue - China Glaze - First Mate
Green - Sephora - Picnic In The Park
Black - Isadora - Gothic Black 
Top coat - Seche Vite


Thanks for looking in here and I hope you liked what you saw. 


04 May, 2013

Band Nails - One Direction Nail Art

Tomorrow I will be on my way to Denmark to go on a concert and I just had to paint my nails for this special occasion. I'm going to see One Direction, my favorite band. I seen them before and then I had nails inspired by them too.

One Direction Nails by Elins Nails

Since all the nails are different I will explain how I did them one by one. First I put on base coat on all my nails. 

On my index finger I have the Irish flag, because Niall in the group is from Ireland. I started with two layers of white. Then I actually used the nail polishes brushes to paint the green and orange on it. 
For the middle finger I started with two layers of red and then with a striping brush I wrote TMH which stands for Take Me Home which is the name of their newest album and the tour. 
On the ring finger I painted the british flag because the four other members are from UK. For this I started with two layers blue and with a a striping brush I painted the white and then the red on it.
And then my pinky I wrote the first letter of every member. I started with two layers of white and then with the colors I used for the rest of the nails I wrote it with a striping brush. And then with a small dotting tool I made a heart. 


One Direction Logo Nail by Elins Nails

And on my thumb I did One Directions logo with a striping brush. Started with two layers of red first. 

The nail polishes I used- 


Don't forget base coat.
White - OPI - Alpine Snow
Red - Claudia - All Red
Blue - H&M - Turquoise 


Orange - Ciaté - Speed Dial
Green - Ciaté - Mojito
Top Coat - Ciaté - Seche Vite


01 May, 2013

American Flag nails - French Manicure Twist

Todays nails are inspired by flags and none other then my favorite country's flag, USA's flag of course.

I done familiar nails before for fourth of july last year but when looking back at them now I'm not so proud of them haha.


Oh gosh no, we shouldn't look at them. Lets go on to todays nails instead. But I guess this means that my nail art skills have grown better and thats always something good. 


American Flag Nail Art by Elins Nails

With this nails a did a little twist of the classical french manicure. I started with base coat as usually, and then I did two layers of white nail polish. Then with a striping brush I made the red lines all over the nails. Once those were completely dry I took some french manicure templates. The package I have had 2 different kinds, curved and straight, and I took the straight ones. Which I think are for you toe nails actually but who cares? I painted the tips blue and later when it was dry I did small dots with a dotting tool over the blue to symbolize the stars on the flag.  


Matte American Flag Nails by Elins Nails

After a while I decided that I might look cool matte. So I made them matte. It's not often I have matte nails but it looks cool so I should probably do it a little more often.


The nail polishes I used for this is -


Don't forget base coat all times to protect your nails.
White - OPI - Alpine Snow
Red - Gina Tricot - Formula One
Blue - Sephora - Curaçao
Matte topcoat - Essie - Matte About You

Which way did you like more - shiny or matte?


22 March, 2013

Golden Arrow Nails

Here comes and easy design because I strained my hand and wanted to do something I could do with one and a half hand. So this is what I ended up with. Before you look at the pictures you will probably think I'm going crazy or something or lost my color sense, but I will explain it all in the post.

I also apologize for the bad pictures, not easy to take pictures when I can't bend my wrist, haha.

Golden Arrow Nails by Elins Nails

To do this nails I started with a base coat on all the nails. Then I painted all my fingers except my ring finger and pinky golden. My ring finger wine red as an accent nail and then my pinky blue. 

On my golden finger I painted some arrow figures with wine red with a striping brush and then golden arrows on my wine red finger.  It kinda reminds me if Iron Man with these colors. 


Blue Pinky Challenge by Elins Nails


So now lets talk about my pinky. I did a blue gradient. And many problem wonders why? So let me tell you about it. There is this organization called 'Mean Stinks', and they wanna reduce the girl-on-girl bullying. That's why they have this thing called 'The Blue Pinky Challenge' with says that you are gonna paint your pinky blue. It's suppose to represent that you do a blue pinky swear to stand up for bullying and gang up for good. I thought this was a good idea and I think you all should do it. Bullying is a good problem and if no one takes care of it it will only get worse, so stand up for bullying and gang up for good. 

The nail polishes I used are these -


Don't forget base coat to protect your nails.
Wine Red - Sephora - Red Berries Smoothie 
Guld - Sephora - I'm A Rich Girl 
Blue - Ciaté - Headliner
Lighter blue - OPI - Can't find my Czechbook
Top coat - Seche Vite

Thanks for reading my blog and remember, gang up for good!


16 March, 2013

St. Patricks Day Nails

Tomorrow is Irelands national day, also called St. Patricks Day. It's the day you are suppose to wear green, or else people have permission to pinch you I just read online. So you better wear green if you don't wanna get pinched, haha.

I just had to paint my nails for this occasion. So I took all my green polishes and put them in front of me, trying to come up with something to do. Put then I just thought I want colorful, so I grabbed loads of other nail polishes too. It was a hell putting them all back later, just fyi. But then I came up with something. So I hope you like this.


St. Patrick Day Nails by Elins Nails

So lets first talk about my accent nail. I just love doing accent nails! But after the putting base coat on I painted my ring finger in a light blue color. Then I started to paint a rainbow with a striping brush. You have no idea how many times I have to start over with this nail because apparently I don't know which colors and where they are in the rainbow. But after I finally got it right, I hope, I made a kettle with the brush on the nail polish and then with a dotting tool I made some gold over it.

St. Patrick Day Nail Art by Elins Nails

For the rest of the nails I started with a light green color. and then with two darker shades of green and a dotting tool I made some clover alike things over the nail. A little failed but that's how it is. 


On my thumb I made a little fail Irish flag, made with the nail polishes brushes. 

The nail polishes I used was -


Always start with base coat!
Red - Claudia - All Red
Orange - Ciaté - Speed Dial
Yellow - Face Stockholm - 171
Green - Ciaté - Mojito
Blue - Sephora - Curaçao
Purple - H&M - Purple Portion 


Green - Viva La Diva - 056
Green - Sephora - Picnic In The Park
Green - Mavala - Pistachio


Top coat - Seche Vite
Blue - China Glaze - Kinetic Candy
Gold - Sephora - I'm A Rich Girl
Brown - OPI - You Don't Know Jacques 
White - OPI - Alpine Snow

Please leave a comment just telling me what you think about this design, ask me anything or just wanna say hey or whatever, haha. 


11 February, 2013

Silver Heart Nails

Time for another Valentines Day design, this time it's something really easy but pretty according to me.


Silver Heart Nails by Elins Nails


For the base I didn't use any tools. Since I'm wearing gellac I already had white base so I just took the pink one and painted half the nails. It was the lightest color and was easiest to paint over so it' didn't have to be super straight. Then I took the red one and painted over, trying to do it as straight as possible. 

Silver Heart Nail Art by Elins Nails

Then with dotting tools I made silver hearts in the middle of all the nails and on the ring finger I added dots around the edges of the nails to create an accent nails. I think this design would look good matte too, maybe I should try that. 

The nail polishes I used was these -


Don't forget the base coat. 
Pink - H&M - Preppy Pink
Red - Claudia - All Red
Silver - Isadora - Silver Sparkle 
Top coat - Seche Vite


Have any question about the design or want a tutorial? Just leave me a comment!


31 January, 2013

Striped Valentines Day Nails

Tomorrow is February 1st which means it's 2 weeks left for Valentines Day. So I thought I would start doing Valentines Day design to inspire you so maybe you can find something to wear on Valentines Day.

So here is the first design of my Valentines Day designs.

Striped Valentines Day Nails by Elins Nails

To do this design I started with a light pink shade as my base. Then with a striping brush I did stripes on the nails in 3 different pink shades. Then with a dotting tool I made red hearts over the nails, and even added some red glitter nail polish over the hearts. 

It was a pretty easy design, you doesn't need that much experience to do this. 

The nail polishes I used is these - 


Don't forget base coat to protect your nails. 
Pink - Ciaté - Cutie Pie
Pink - H&M - City 
Pink - OPI - Pompeii Purple
Pink - Gina Tricot - Candyfloss


Red - Claudia - All Red
Red Glitter - Ciaté - Enchanted Rose
Top Coat - Seche Vite

I hope you like this design and that you look forward to the next Valentines Day design. 


03 January, 2013

Cupcakes Nails

Todays nails is inspired by a cookie jar I got for christmas present. I like the print on it and thought it would be a good nail design.

Cupcake Nail Art by Elins Nails

I thought it came out pretty well, makes me really want a cupcake. I tried to match the colors as well as I could but I might have a lot of nail polish but I don't have every colors. I used one of the lightest green for the background, so I didn't have a green for the cupcakes so I made them blue instead. 


Cupcake Nails by Elins Nails

I thought I ruined it when I added the black lines around everything. But on the cookie jar the lines are a little sloppy so I did them a little sloppy. But I think it ended pretty well anyway so I'm satisfied. Don't think it would have been much better if I did the lines perfect.

The nail polishes I used -


Base Coat - Isadora - Second Nail
Green - Sephora - Lime Cocktail
Brown - OPI - You Don't Know Jacques
Light Brown - H&M - Nude Dude
Blue - China Glaze - Kinetic Candy


Yellow - Ciaté - Big Yellow Taxi
Purple - H&M - Liberty Girl
Pink - H&M - City
Light Pink - Gina Tricot - Candy Floss


White - China Glaze -White Out
Red - Claudia - All Red
Black - Isadora - Gothic Black
Top Coat - Seche Vite 

What you think about this design?


01 January, 2013

Happy New Years - Firework Nails

These nails were suppose to go up yesterday but got in a hurry to leave for the new years celebration. But here comes my new years nails.

Fireworks Nails by Elins Nails

To do these nails I started with base coat and then two layers of a really dark blue. Then with a dotting tool and loads of different colors I made a firework kinda thing over the nails and then wrote 2013 over it. My index finger is a little messed now because my brother touch it before it had dried. 


This is how the the fireworks looked like. 

Here is the nail polishes I used -


Base Coat - Isadora - Second Nail
Green - Ciaté - Mojito
Yellow - Ciaté - Big Yellow Taxi
Orange - Ciaté - Speed Dial


Blue - Sephora - Curaçao
Green - Sephora - Picnic In The Park
Red - Claudia - All Red
Purple - H&M - Lilac Plum


Pink - H&M - Pink Preppy
Dark Blue - China Glaze - Up All Night
White - China Glaze - White Out
Top Coat - Seche Vite

Hope you all will have a great 2013!


26 December, 2012

Hunger Games Nails

Todays nails are inspired by the hunger games. Got the dvd in christmas present so I thought I could do some hunger games nails now, always wanted to some so now I did it.

Hunger Games Nails by Elins Nails

I did a fire gradient on all my nails except my ring finger where I did the mockingbird pin. 

Hunger Games Nail Art by Elins Nails

Tried to give the mockingbird some layers so I first started with painting it gold and then added some yellow on top. Think it ended up pretty well. 

This are the nail polishes I used -


Base Coat - Isadora - Second Nail
Yellow - China Glaze - Sunshine Pop
Black - Isadora - Gothic Black
Orange - Depend - nr. ??
Red - Claudia - All Red
Gold - Gina Tricot  - Gold
Top Coat - Seche Vite

What you think of this design?