Elins Nails: March 2013

30 March, 2013

Easter Nails - Colorful Polka Dots Nails with Gradient

I hope you all are having a great easter weekend so far. I thought I would share my second and last easter designs for this year. I wanted to do more, but unfortunately my fantasy ended here and all my ideas just reminded me of the one I already did so I thought I would draw the line here.

This design is pretty colorful, which I think is very suiting for easter. I don't know why but I see easter as a colorful holiday. This design consist of gradients and polka dots. I even did something I don't usually do, I did the nails matte. I usually wear the design a while with regular top coat and then do it matte.

Colorful Polkadot Nails by Elins Nails

I started with base coat on all the nails and then two layers of white. Then I did gradients with a different color on every nail. The gradient I did with a make up sponge which I used to dab the colors on the white nails. Then with a dotting tool I made white polka dots all over the nail. 


I think it had gave a great affect with the white polka dots with the color to white gradient. 

The nail polishes I used for this design is these -


Always use a base coat first.
White - OPI - Alpine Snow
Green - Sephora - Lime Cocktail
Purple - Rimmel - 312 Ultra Violet
Yellow - Face Stockholm - 171


Orange - Isadora - South Beach
Pink - Gina Tricot - Candyfloss
Matte Top Coat - Essie - Matte About You


Please leave a comment about the design, I would mean a lot to me.

24 March, 2013

Easter Nails

Easter is here and I'm finally allowed to do Easter design, which I love. Easter is colorful and pastel colors fit perfectly here.

For this design I started with five base colors, one for every finger. And these colors where the main colors in my design which I used the most of. Then I added two accent nail where I added some other colors.


Easter Nails by Elins Nails

I started with painting all the nails with base coat and then every nail with the base color I decided for them. I went on pretty light colors, like pastel like. I did my pinky blue on purpose to continue with the blue pinky challenge, which you can read more about in last post. The thumb that you can't see on this picture is the green polish that you can see on the rest of the nails. The three nails are then suppose to look something like an Easter egg. So with the five base colors I made some zigzag lines and straight lines with a striping brush. Then some random dots with a dotting tool. Added some white dots too to fill the empty spaces because I didn't want the to use the same color next to each other. 

Easter Nail Art by Elins Nails

On my ring finger is then suppose to be the Easter bunny. I started with painting the shape with a striping brush and then with a larger brush I filled it in. Then I did the eyes and nose with different sized dotting tools. Take notice its not skew-eyed like it usually is haha. Then I added the whiskers and then with a dotting tool I added some light pink on the cheeks and ears. 


My thumb have a little chicken on it. The body is made with dotting tools and also the eyes. The hair, neb and eggshell is made with a striping brush. 


The tons on nail polish I used for this -


Don't forget the base coat. 
My five base colors.
Green - Mavala - Pistachio
Pink - Essie - Splash Of Grenadine 
Orange - Mavala - Fresh Melon
Purple - OPI - You're Such A Budapest
Blue - China Glaze - Kinetic Candy


Brown - OPI - You Don't know Jacques
White - OPI - Alpine Snow
Black - Isadora - Gothic Black
Light Pink - Ciaté - Cutie Pie


Darker Orange - Ciaté - Speed Dial
Yellow - Ciaté - Big Yellow Taxi
Top Coat - Seche Vite 

Thanks for checking out my blog!


22 March, 2013

Golden Arrow Nails

Here comes and easy design because I strained my hand and wanted to do something I could do with one and a half hand. So this is what I ended up with. Before you look at the pictures you will probably think I'm going crazy or something or lost my color sense, but I will explain it all in the post.

I also apologize for the bad pictures, not easy to take pictures when I can't bend my wrist, haha.

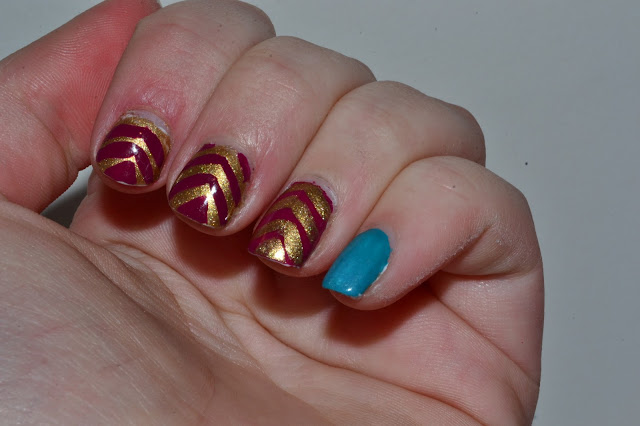
Golden Arrow Nails by Elins Nails

To do this nails I started with a base coat on all the nails. Then I painted all my fingers except my ring finger and pinky golden. My ring finger wine red as an accent nail and then my pinky blue. 

On my golden finger I painted some arrow figures with wine red with a striping brush and then golden arrows on my wine red finger.  It kinda reminds me if Iron Man with these colors. 


Blue Pinky Challenge by Elins Nails


So now lets talk about my pinky. I did a blue gradient. And many problem wonders why? So let me tell you about it. There is this organization called 'Mean Stinks', and they wanna reduce the girl-on-girl bullying. That's why they have this thing called 'The Blue Pinky Challenge' with says that you are gonna paint your pinky blue. It's suppose to represent that you do a blue pinky swear to stand up for bullying and gang up for good. I thought this was a good idea and I think you all should do it. Bullying is a good problem and if no one takes care of it it will only get worse, so stand up for bullying and gang up for good. 

The nail polishes I used are these -


Don't forget base coat to protect your nails.
Wine Red - Sephora - Red Berries Smoothie 
Guld - Sephora - I'm A Rich Girl 
Blue - Ciaté - Headliner
Lighter blue - OPI - Can't find my Czechbook
Top coat - Seche Vite

Thanks for reading my blog and remember, gang up for good!


21 March, 2013

Swatch - OPI Can't Find My Czechbook

Today I'm gonna show you a swatch from OPI's newest collection, Euro Central. The color is called 'Can't Find My Czechbook'.

It's a pretty blue almost turquoise cream polish. Just like most OPI polishes it haves a great formula and covers well with two layers.

I find it really nice, one of my favorite polish from this collection. It's a little darker then I thought it would be but it's still really nice.


Can't Find My Czechbook Swatch by Elins Nails


What do you think about this nail polish? You like it? Look in tomorrow for a design including this nail polish. 


18 March, 2013

Swatch - Nails Inc. Leather Effect

Here comes a swatch for all of you guys. When I first saw this on a few blogs I knew exactly that I just had to have it. So when I saw it standing on the shelf at Sephora I just had to take it.

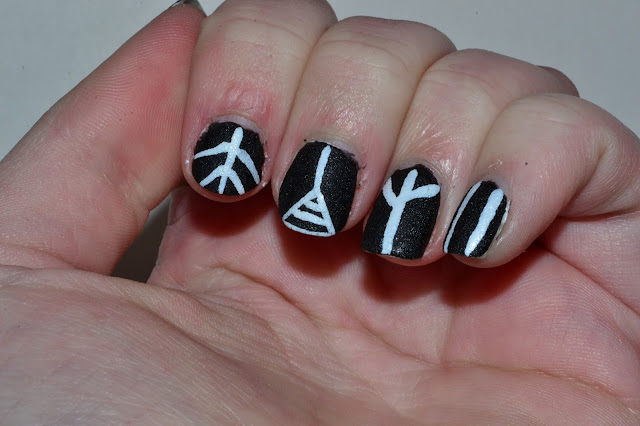
Nails Inc. Leather Effect Swatch by Elins Nails

This nail polish dries to a surface that is suppose to remind of leather. It's almost like OPI's liquid sand polishes but it doesn't dry to such a grainy surface. It's actually pretty soft, but still not. It's so hard to explain. 

Nails Inc. Leather Effect Nail Art by Elins Nails

To do something fun about this I added some design over it with white nail polish. Black and white can never go wrong. I didn't add some top coat over this to not destroy the charm with this nail polish. 


With this kit you got some studs and crystal with it, which I'm saving for another time. 

What you think about this? 


16 March, 2013

St. Patricks Day Nails

Tomorrow is Irelands national day, also called St. Patricks Day. It's the day you are suppose to wear green, or else people have permission to pinch you I just read online. So you better wear green if you don't wanna get pinched, haha.

I just had to paint my nails for this occasion. So I took all my green polishes and put them in front of me, trying to come up with something to do. Put then I just thought I want colorful, so I grabbed loads of other nail polishes too. It was a hell putting them all back later, just fyi. But then I came up with something. So I hope you like this.


St. Patrick Day Nails by Elins Nails

So lets first talk about my accent nail. I just love doing accent nails! But after the putting base coat on I painted my ring finger in a light blue color. Then I started to paint a rainbow with a striping brush. You have no idea how many times I have to start over with this nail because apparently I don't know which colors and where they are in the rainbow. But after I finally got it right, I hope, I made a kettle with the brush on the nail polish and then with a dotting tool I made some gold over it.

St. Patrick Day Nail Art by Elins Nails

For the rest of the nails I started with a light green color. and then with two darker shades of green and a dotting tool I made some clover alike things over the nail. A little failed but that's how it is. 


On my thumb I made a little fail Irish flag, made with the nail polishes brushes. 

The nail polishes I used was -


Always start with base coat!
Red - Claudia - All Red
Orange - Ciaté - Speed Dial
Yellow - Face Stockholm - 171
Green - Ciaté - Mojito
Blue - Sephora - Curaçao
Purple - H&M - Purple Portion 


Green - Viva La Diva - 056
Green - Sephora - Picnic In The Park
Green - Mavala - Pistachio


Top coat - Seche Vite
Blue - China Glaze - Kinetic Candy
Gold - Sephora - I'm A Rich Girl
Brown - OPI - You Don't Know Jacques 
White - OPI - Alpine Snow

Please leave a comment just telling me what you think about this design, ask me anything or just wanna say hey or whatever, haha. 


15 March, 2013

Matte Ikat Nails

Decided to make my Ikat nails matte. I think matte nails are really nice and everytime I do it I always tell myself why don't I do this more often.

To do this I used Essie's Matte About You. It's the best matte top coat I ever tried.

Here under you can see the comparison between matte and shiny. You can't see this much I notice now but you can see it in the shimmer and the light reflection. The first picture is shiny and the second is matte.


Which one you liked the most - shiny or matte?


14 March, 2013

Ikat Nails

I just got home with two new nail polishes, both from OPI's collection Euro Central. I know directly that I wanted to do something with both those nail polishes. So then I came up with the Ikat design. It's a pretty easy design that lets you be a little sloppy and still get a good results.

Ikat Nails by Elins Nails

Before doing anything I started with a base coat. Then I painted all my nails blue. Then with the nail polish brush I added some random spots with the pink nail polish. Then I took the white and made some spots in the pink. Then with a striping brush I made small black lines all around it and then in the middle of the white too. Then because I wanted more pink I added more pink over the black in the middle, but this isn't something you have to do.

The nail polishes I used -


Always start with a base coat. 
Blue - OPI - Can't Find My Czechbook
Pink - OPI - Suzi's Hungary Again
White - OPI - Alpine Snow
Black - Isadora - Gothic Black

Then I had Seche Vite top coat over that but forgot to include that in the picture. 

Thanks for visiting my blog and I hope to see you around again. 


12 March, 2013

One Colored Spring Nails

Here is the one colored spring nail design which I made last week. I did this nails for a friend. So I thought I would show you how it looked like when you only use one color because maybe not everyone wanna be as colorful as me, haha.

Orange Flower Nails by Elins Nails


Please leave a comment below, would mean a lot to me. 

08 March, 2013

A Fabulous French Manicure - Glitter

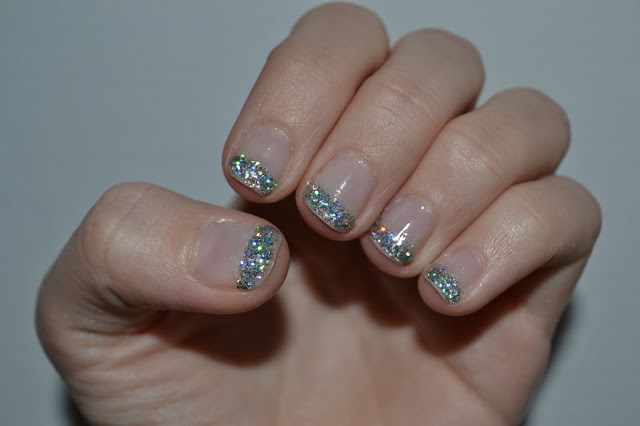
The design I'm gonna show you today I made for a friend last year for new years eve. Wanted to show you these because there is much you can do with the classical french manicure. Only the fantasy will stop you. It don't have to be the typical white tip french manicure you can use whatever color you want or glitter if you want that.

This design I did with the nail polish brush. It's a glitter french manicure to fit with the new years eve theme. Loads of coats, but it was worth it.

Glitter French Manicure by Elins Nails

Easy but the result says - FABULOUS! Sorry, it was the only word I could came up with to describe this. This is just one of many ways to do a french manicure, like I said before only your fantasy will stop you.

Please leave a comment, just say hey or something. All comments are so welcome. 

06 March, 2013

Spring Nails - Colorful Flower Nails

Spring is finally here. This morning my thick winter jacket went into the closet, the sun is shining and the birds are singing their songs. This I'm celebrating with some new nails. I'm gonna apologize for my lack of inspiration lately. Hoping I full of inspiration now when the gray winter days are over.

When I did these nails I wanted color, fun colors, springy colors. I couldn't chose just a few ones, I wanted as many as possible. These nails even gave me a little vintage feeling over these, but maybe that's only me? But I'm satisfied with these and think they are pretty .... springy?

Also apologizing for my cuticles. Can't find my cuticle cream, I'm almost panicking. Then the flash makes it even worse. You have to look at my nails extra much, and I will try finding a new cuticle cream!

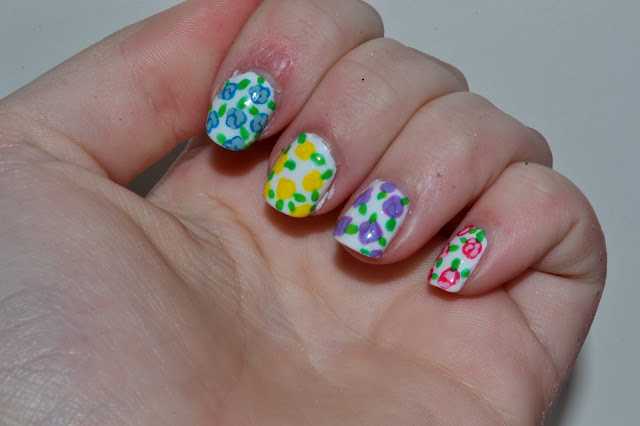
Colorful Flower Nails by Elin

For this I started with base coat. Then I painted all nails with two layers of white. Then two shades of the color you want from the flowers and the green for the leaf. One light and one darker. You can do all the flowers in on color if you don't want to. I just wanted to be really colorful. The flowers are done with a a kinda big dotting tool first with the darker color. Then with a smaller dotting tool I made some pattern with the lighter color. 


Colorful Flower Nail Art by Elins Nails

With a small brush I painted the leaf with the dark green. Then I made some thinner line with the lighter green over that. It doesn't really show in the picture put it looks good in real life. 


My thumb is checking in too, to show you another color combo. 

The nail polishes I used for this is - 


White - OPI - Alpine Snow
Dark orange - Ciaté - Speed Dial
Light Orange - Mavala - Fresh Melon
Dark Blue - Sephora - Curaçao
Light Blue - China Glaze - Kinetic Candy


Dark Yellow - China Glaze - Sunshine Pop 
Light Yellow - Ciaté - Big Yellow Taxi
Dark Purple - Rimmel - Ultra Violet
Light Purple - OPI - You're Such A Budapest


Dark Pink - H&M - City 
Light Pink - Gina Tricot - Candyfloss
Dark green - Viva La Diva - 056
Light Green - Ciaté - Mojito
Top coat - Seche Vite

I hope you like this design as much as I do. 

Might write here that you can follow me on instagram - elinbeliebs. There come up some behind the scenes sometimes and sometimes designs come up here sometimes earlier then here.